

How To Install Ssl Certificate In Iis Windows Server 2012
Creating a CSR and installing your SSL Certificate on Windows Server 2012
Use the instructions on this page to create your document signing request (CSR) and so to install your SSL document in IIS 8 on Windows Server 2012 or IIS 8.5 on Windows Server 2012 R2.
- To create your CSR, see IIS 8 and IIS 8.5: How to Create Your CSR on Windows Server 2012.
- To install your SSL certificate, run across IIS eight and IIS viii.5: How to Install and Configure Your SSL Document on Windows Server 2012.
If you are looking for a simpler way to create CSRs and install and manage your SSL Certificates, we recommend using the DigiCert® Certificate Utility for Windows. You can utilise the DigiCert Utility to generate your CSR and install your SSL certificate. See Windows Server 2012: Create CSR & Install SSL Certificate with DigiCert Utility.
Step 1: Create Your CSR in IIS 8 or IIS 8.v on Windows Server 2012
-
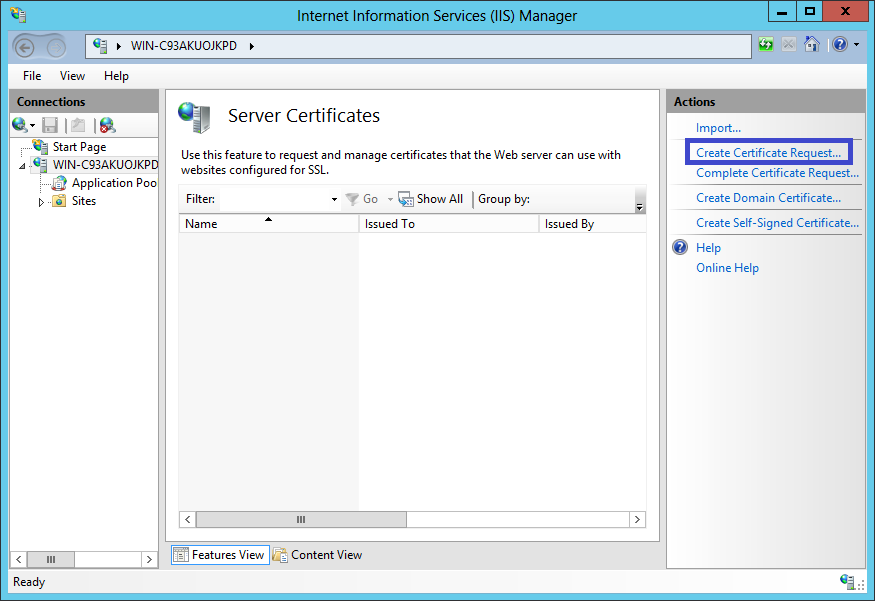
From the Start screen, find Cyberspace Information Services (IIS) Manager and open it.
-
In the Connections pane, locate and click the server.
-
In the server Habitation page (centre pane) nether the IIS department, double-click Server Certificates.

-
In the Deportment menu (correct pane), click Create Certificate Request.
-
In the Request Document wizard, on the Distinguished Proper name Properties page, provide the information specified beneath so click Next.
Common proper name: The fully-qualified domain name (FQDN) (e.g., www.example.com). Organization: Your company's legally registered proper noun (eastward.thou., YourCompany, Inc.). Organizational unit of measurement: The name of your department within the system. This entry will usually exist listed equally "Information technology", "Spider web Security", or is simply left bare. City/locality: The metropolis where your visitor is legally located. State/province: The land/province where your company is legally located. Country/region: The country/region where your company is legally located. Utilise the drop-downwardly listing to select your land. 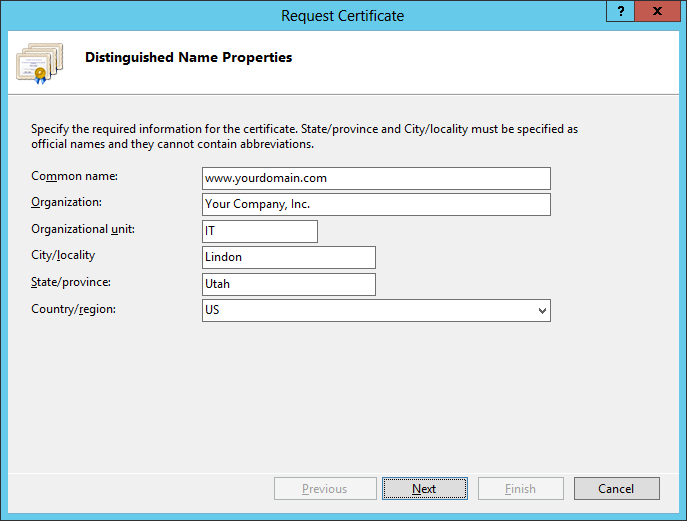
-
On the Cryptographic Service Provider Properties page, provide the information specified beneath and so click Side by side.
Cryptographic service provider: In the drop-downward listing, select Microsoft RSA SChannel Cryptographic Provider (unless you have a specific cryptographic provider). Bit length: In the drib-downwards listing, select 2048 (unless you accept a specific reason for using a larger flake length). 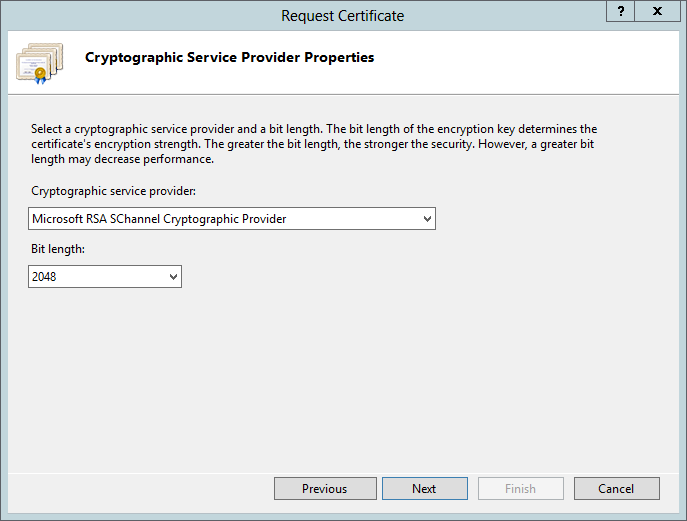
-
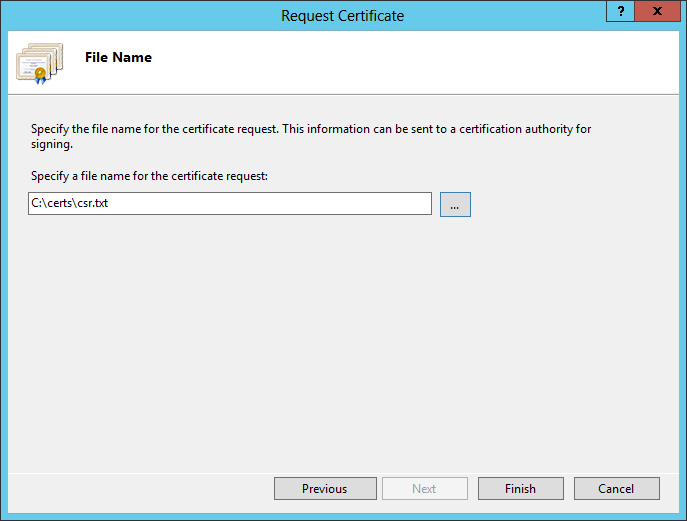
On the File Proper name page, under Specify a file proper name for the certificate asking, click the … push to specify a save location for your CSR.
Note: Recollect the filename and relieve location of your CSR file. If y'all enter a filename without specifying a location, your CSR will exist saved to C:\Windows\System32.
-
When you are washed, click Finish.
-
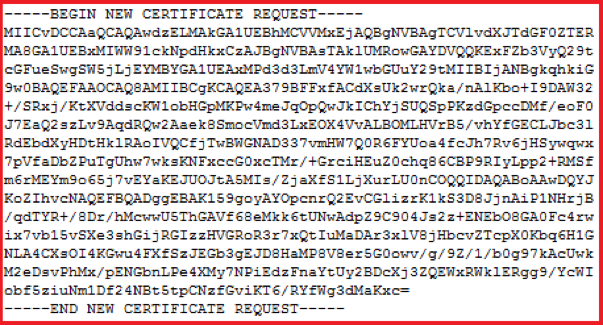
Open up the CSR file using a text editor (such every bit Notepad), then copy the text (including the -----BEGIN NEW CERTIFICATE REQUEST----- and -----END NEW CERTIFICATE Asking----- tags) and paste it into the DigiCert society form.
-
After you lot receive your SSL certificate from DigiCert, you lot can install information technology.
Step 2: Install and Configure Your SSL Certificate in IIS 8 or IIS eight.5 on Windows Server 2012
If you have not yet created a CSR and ordered your certificate, run into IIS viii and IIS viii.5: How to Create Your CSR on Windows Server 2012.
After we validate and issue your SSL certificate, you need to install it on the Windows 2012 server where the CSR was generated. Then, yous need to configure the server to apply it.
- (Single Certificate) How to install and configure your SSL certificate
- (Multiple Certificates) How to install and configure your SSL certificate using SNI
(Single Certificate) How to install your SSL document and configure the server to utilise it
-
On the server where you lot created the CSR, save the SSL certificate .cer file (e.m., your_domain_com.cer) that yous received from DigiCert.
-
From the Outset screen, observe Internet Information Services (IIS) Manager and open it.
-
In the Connections pane, locate and click the server.
-
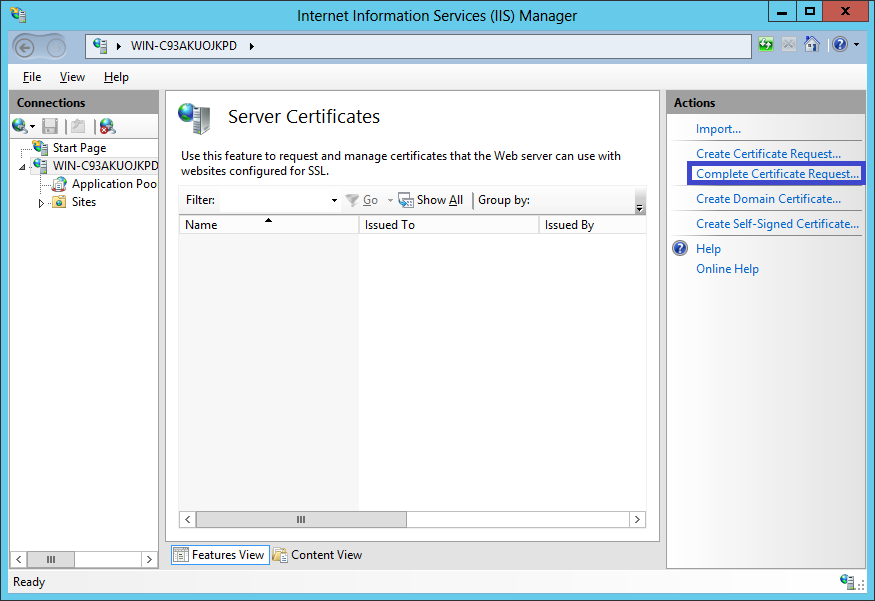
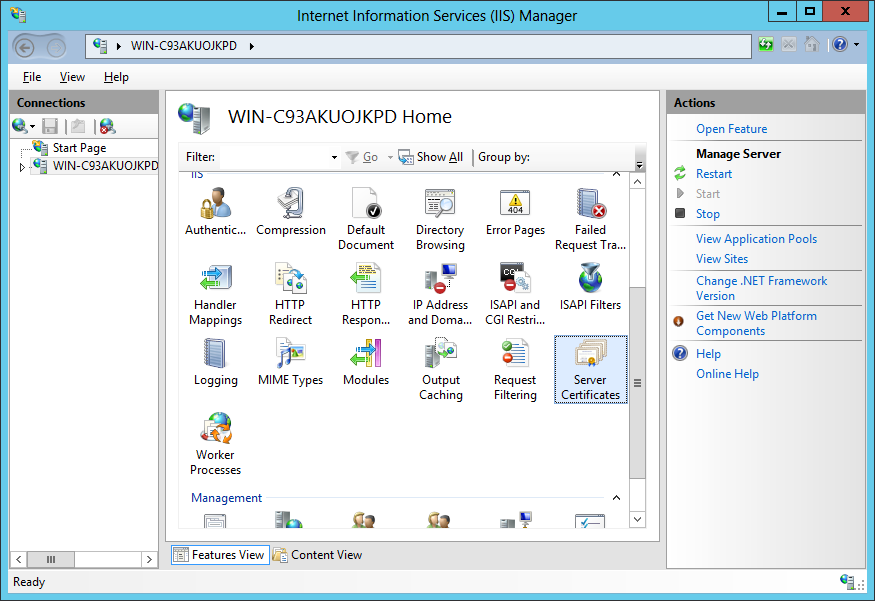
In the server Dwelling page (center pane) under the IIS department, double-click Server Certificates.
-
In the Actions menu (right pane), click Consummate Certificate Request.
-
In the Consummate Certificate Request sorcerer, on the Specify Certificate Authority Response folio, provide the following information:
File name containing the certificate authority's response: Click the … push button to locate the .cer file you received from DigiCert
(east.g., your_domain_com.cer).Friendly name: Type a friendly name for the document. This is non function of the certificate; instead, it is used to identify the document. Note: We recommend that you add the issuing CA (e.g., DigiCert) and the expiration date to the end of your friendly name; for example, yoursite-digicert-(expiration date). Doing this helps place the issuer and expiration date for each certificate and likewise helps distinguish multiple certificates with the same domain name.
Select a certificate store for the new certificate: In the drop-down listing, select Personal. 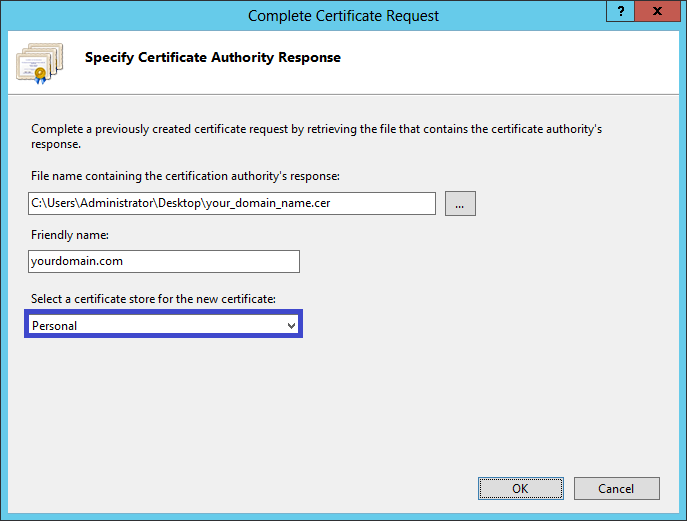
-
Click OK to install the certificate.
-
At present that you've successfully installed your SSL certificate, you need to configure your site to utilise it.
-
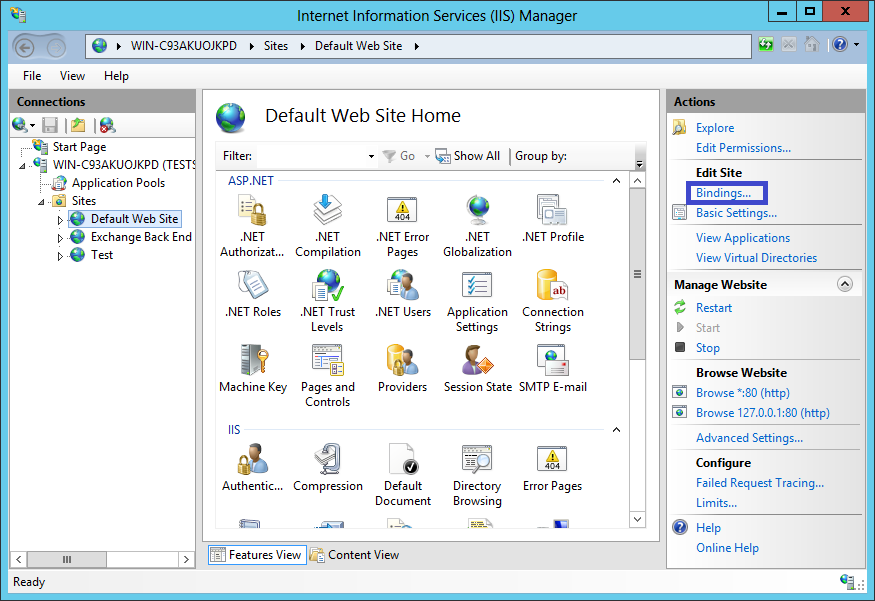
In Internet Information Services (IIS) Manager, in the Connections pane, aggrandize the proper noun of the server on which the certificate was installed. Then expand Sites and click the site you desire to secure using the SSL certificate.
-
In the Actions carte (right pane), click Bindings.
-
In the Site Bindings window, click Add.
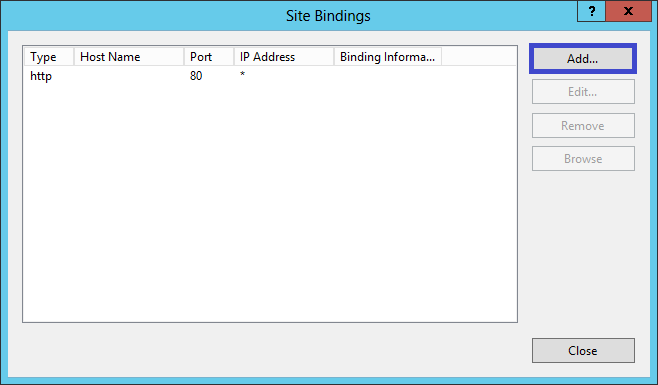
-
In the Add Site Bounden window, do the following and then click OK.
Type: In the drop-downwardly list, select https. IP address: In the driblet-down listing, select the IP accost of the site or select All Unassigned. Port: Type 443. (SSL uses port 443 to secure traffic.) SSL certificate: In the drop-down list, select your new SSL certificate (e.one thousand., yourdomain.com). 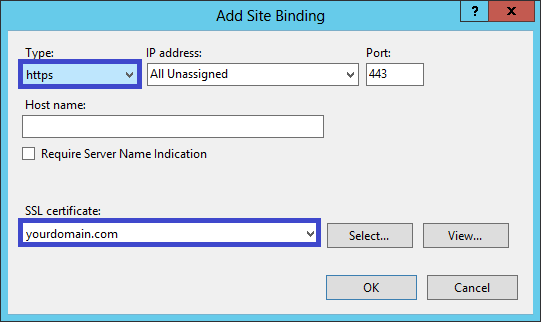
-
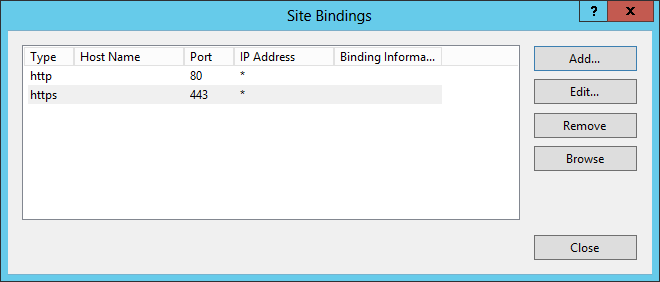
Your SSL certificate is at present installed, and the website is configured to have secure connections.
Install Your SSL Certificate
Assign Your SSL Certificate
Note: To enable your SSL certificate for utilise on other Windows servers, encounter PFX export instructions.
(Multiple Certificates) How to install your SSL certificates and configure the server to employ them using SNI
These instructions explains how to install multiple SSL certificates and assign them using SNI. The procedure is carve up into two parts as follows:
-
Installing and Configuring Your First SSL Certificate
-
Installing and Configuring All Additional Certificates
Install Start SSL Certificate
Do this showtime set of instructions just once (for the first SSL document).
-
On the server where you created the CSR, save the SSL certificate .cer file (e.g., your_domain_com.cer) that y'all received from DigiCert.
-
From the Start screen, find Cyberspace Data Services (IIS) Manager and open up information technology.
-
In the Connections pane, locate and click the server.
-
In the server Home page (centre pane) nether the IIS department, double-click Server Certificates.
-
In the Actions carte du jour (correct pane), click Complete Certificate Asking.
-
In the Complete Document Request wizard, on the Specify Certificate Authorization Response folio, provide the following data:
File name containing the certificate dominance's response: Click the … button to locate the .cer file yous received from DigiCert
(e.g., your_domain_com.cer).Friendly name: Type a friendly proper name for the certificate. This is non part of the certificate; instead, it is used to identify the certificate. Note: We recommend that you add the issuing CA (due east.grand., DigiCert) and the expiration date to the end of your friendly name; for example, yoursite-digicert-(expiration date). Doing this helps identify the issuer and expiration date for each certificate and likewise helps distinguish multiple certificates with the same domain name.
Select a document store for the new certificate: In the drop-down listing, select Spider web Hosting. 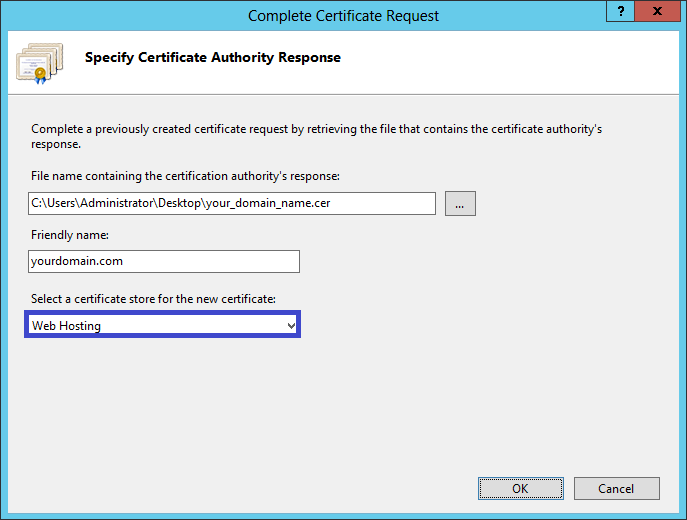
-
Click OK to install the certificate.
Notation: There is a known issue in IIS viii where clicking OK throws a Failed to remove the certificate error. If this is the same server that you generated the CSR on, the mistake tin can usually exist ignored. Merely click OK and press F5 to refresh the listing of server certificates. If the new document appears in the list, and then it was installed successfully; however, you may want to make certain the certificate is besides in the Web Hosting certificate store. If the certificate does non announced in the Web Hosting certificate store, you tin can manually move it there (encounter Movement Certificate to Another Document Store).
If the certificate does not appear on the listing after refreshing, you will need to reissue your certificate using a new CSR (encounter IIS eight and IIS eight.5: How to Create Your CSR on Windows Server 2012). After creating a new CSR, you volition demand to re-primal your certificate.
-
At present that y'all've successfully installed your SSL certificate, yous need to configure your site to employ it.
-
In Internet Information Services (IIS) Manager, in the Connections pane, aggrandize the name of the server on which the certificate was installed. And so expand Sites and click the site you desire to secure using the SSL certificate.
-
In the Actions menu (right pane), click Bindings.
-
In the Site Bindings window, click Add.
-
In the Add Site Binding window, exercise the post-obit and then click OK.
Type: In the drop-down list, select https. IP accost: In the drop-down list, select the IP address of the site or select All Unassigned. Port: Blazon 443. (SSL uses port 443 to secure traffic.) SSL certificate: In the drop-downwards list, select the SSL certificate you lot installed in Step 7 (e.grand., yourdomain.com). -
Your showtime SSL certificate is at present installed, and the website is configured to accept secure connections.
Install Additional SSL Certificates
To install and assign each additional SSL document, repeat the steps below (as needed).
-
On the server where you created the CSR, save the SSL certificate .cer file (e.k., your_domain_com.cer) that you received from DigiCert.
-
From the Start screen, find Internet Information Services (IIS) Manager and open up it.
-
In the Connections pane, locate and click the server.
-
In the server Home folio (centre pane) nether the IIS section, double-click Server Certificates.
-
In the Deportment carte (right pane), click Complete Certificate Asking.
-
In the Complete Certificate Request wizard, on the Specify Certificate Dominance Response page, provide the following information:
File name containing the certificate say-so's response: Click the … button to locate the .cer file you received from DigiCert
(due east.g., your_domain_com.cer).Friendly proper noun: Type a friendly name for the certificate. This is not part of the certificate; instead, information technology is used to identify the certificate. Note: We recommend that you add the issuing CA (due east.g., DigiCert) and the expiration appointment to the terminate of your friendly name; for example, yoursite-digicert-(expiration engagement). Doing this helps identify the issuer and expiration appointment for each document and also helps distinguish multiple certificates with the same domain name.
Select a certificate store for the new certificate: In the drop-down listing, select Spider web Hosting. -
Click OK to install the certificate.
-
Now that you've successfully installed your SSL document, you need to configure your site to use it.
-
In Net Data Services (IIS) Manager, in the Connections pane, expand the name of the server on which the document was installed. Then expand Sites and click the site you want to secure using the SSL certificate.
-
In the Actions menu (right pane), click Bindings.
-
In the Site Bindings window, click Add together.
-
In the Add Site Binding window, practise the following and then click OK.
Type: In the drop-down listing, select https. IP accost: In the drop-down list, select the IP accost of the site or select All Unassigned. Port: Type 443. (SSL uses port 443 to secure traffic.) Host name: Blazon the host name that you want to secure. Require server proper name indication: Select this checkbox afterward you lot enter the host name. Annotation: This option is required for any additional certificates/sites afterwards installing the first certificate on the main site.
SSL document: In the drib-downwards list, select the SSL certificate you installed in Step 7 (e.g., yourdomain.com). 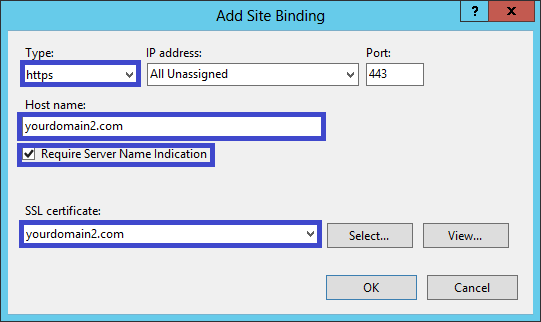
-
Yous accept successfully installed another SSL certificate and configured the website to accept secure connections.
Source: https://www.digicert.com/kb/csr-ssl-installation/iis-8-and-8.5.htm
Posted by: caricoevelf1974.blogspot.com
0 Response to "How To Install Ssl Certificate In Iis Windows Server 2012"
Post a Comment